Creating an audio only podcast with
GarageBand 08
Connecting Microphone
Before you open
GarageBand, go ahead and connect an external microphone if that is what you
plan to use (you may also use the computers internal mic).
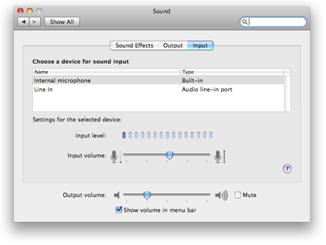
• Go to System
Preferences under the Apple menu (or click the icon in the dock) and click on
Sound.
• Click on the input
tab and you will see a list of connected audio input devices on the Mac. Click
the input device you would like to use to select it.
• Next, speak or
sing into your microphone at the approximate level you will be speaking or
singing.
• Adjust the input
levels using the input volume slider so that the input levels are at about 80%
of the sound input indicator bar. This will set the initial Audio levels to
avoid distorting the audio during recording.
While in the Sound control
panel you can set an output device.
• Click on the Output tab.
Choose the device you would like to use.
• Click on the red close button
to close the Sound control panel.
NOTE: You can also change these
settings in GarageBand by going to GarageBand > Preferences and selecting
the Audio/Midi tab.
Creating a GarageBand
Project
When you start GarageBand
you will be given four choices. You can choose Create New Music Project, Open
An Existing Project, Create New Podcast Episode or Magic GarageBand.
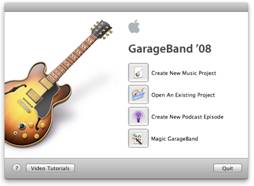
Create a New Podcast
Episode
This is the option you
will choose to create an audio podcast or audio enhanced podcast with chapter
markers and images. This option automatically inserts a podcast track along
with Male Voice and Female Voice tracks, and a Jingles track for music
NOTE: No matter which
project you choose, you always have the option to add or remove tracks. For
example, if you create a music project, you can always add a video or podcast
track to it.
Add a Music Intro
You can use Garageband’s
pre-made loops to add a music intro to your podcast.
To add an intro:
• First view the Loop
Browser by going to Control > Show Loop Browser or click the View/Hide the Loop
Browser icon.
![]()
• Next, click the Sounds
View icon.
![]()
• Choose Jingles under the
Loop column.
• Under the Jingles column
you can choose one of the categories or choose All Effects to preview the
jingles.
• Click on a jingle in the
Name column to preview. Click again to stop.
• When you have found one
you would like to use, simply click and drag it up to the Jingles track in the
main window to insert it. (Your intro should probably not be more than 10-15
seconds long)
Recording
To begin recording:
• First, click on the
Enable or Disable Recording button on the track you want to record to. Red
indicates that the track is armed and ready to record.
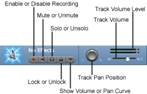
• Next, place the play
head in the spot you want the recording to begin. If you have intro music, place
the play head after it.
• Now click the Start or
Stop Recording button. Glowing red indicates that it is recording.
![]()
• Click the Start or Stop
Recording button again to end recording.
Editing
Before you begin editing a
track, make sure to select the desired track by clicking on it.
Trimming
To trim the audio clip in
a specific track simply place your cursor over the beginning or end of the clip
(near the bottom). When you see the left and right arrow, click and drag in the
direction you want to trim.
Saving an Audio Podcast
To save as an mp3:
• Click Share in the main
menu and choose Export Song to Disk.
• Check compress if not
checked
• Choose MP3 Encoder from
the Compress Using drop-down menu
• Choose Good Quality from
the Audio Settings drop-down. This option is best suited for voice.
• Click Export.
Note where you export the
MP3 to, as this file will be your podcast.
This information was found
in: http://www.wiu.edu/citr/archives/pdf/workshops/Podcasting_GarageBand.pdf.